
📚 Manage Planet 4 > Integrate P4 > OptiMonk > Analytics
You can easily integrate Google Analytics with OptiMonk to track referrals and events from your popups. See below the best practices and instruction guides for monitoring your campaign’s performances.
Keep track of the original traffic sources
For campaigns and popups that aims to redirect users to another domain, it’s important that we store the original traffic sources (URL tracking parameter). To make sure that we are not breaking the user’s sessions, we strongly recommend to not use tracking parameters on the links created in OptiMonk’s popup.
In OptiMonk’s popup editor you should also enable the option “Keep URL parameters” whenever creating a new call to action. Follow the example below:

When enabling this feature, OptiMonk will store the original traffic source from the tracking parameter and append to the link of the destination domain URL. See example below:
From:

To:

You can also use the Realtime reports in Google Analytics to debug your settings:

Understanding OptiMonk’s Events
OptiMonk provides us with some pre-defined events for monitoring user interactions with the campaigns created. The events are sent via dataLayer.push method and follow the structure below:
| Event Structure | DataLayer.push | |
| Category | OptiMonk | { ‘OptiMonk action’: ‘{{action}}’, ‘OptiMonk label’: ‘{{Campaign Name}}’, ‘OptiMonk category’: ‘OptiMonk’, ‘event’: ”OptiMonk ‘ + {{action}}’ }; |
| Action | {{action}} | |
| Label | {{Campaign Name}} |
Note that the {{campaign name}} value is the same as defined in OptiMonk when you’re starting a new campaign. On the other hand, the {{action}} value will vary according to the user type of interaction.
| OptiMonk’s types of event action | |
| shown | when a campaign is shown to the user (impression) |
| filled | when the user converts on the campaign objective (eg. clicks on the cta button) |
| no | when the user rejects the campaign (clicks on the closing link) |
| close(x) | when the user closes the popup |
Check below an example of a sequence of dataLayer.push events fired when a user is presented with a popup and then converts by clicking on the call to action:

Set up events in Google Tag Manager
We are using Google Tag Manager to read the dataLayer events sent from OptiMonk to Google Analytics. The setup is very simple and it only requires one trigger, two variables and one event tag. Follow the instructions below to implement it on your container.
- Setup the triggers
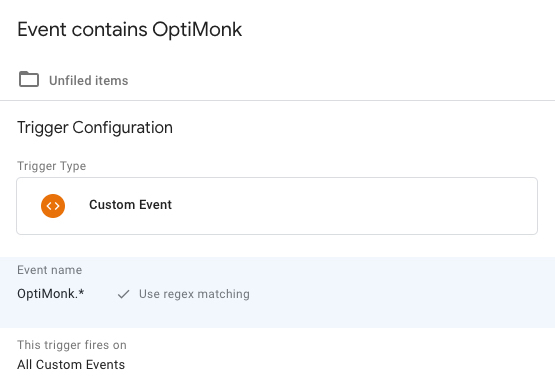
- In Google Tag Manager go to Triggers > New > select the Custom Event trigger type.
- In Google Tag Manager go to Triggers > New > select the Custom Event trigger type.
- Name your new variable as “Event contains OptiMonk”
- Enable the checkbox for regex matching and define the event name = OptiMonk.*
- Set up the variables
- In Google Tag Manager go to Variables > User-defined variables > New > select the Data Layer Variable type
- Name your variable as “DLV – optiMonk action”
- Define the Data Layer Variable Name = OptiMonk action
- Repeat the first step and create another variable with the name “DLV – optiMonk label”
- In Google Tag Manager go to Variables > User-defined variables > New > select the Data Layer Variable type


- Define the Data Layer Variable Name = OptiMonk label
- Set up the Universal Analytics event tag
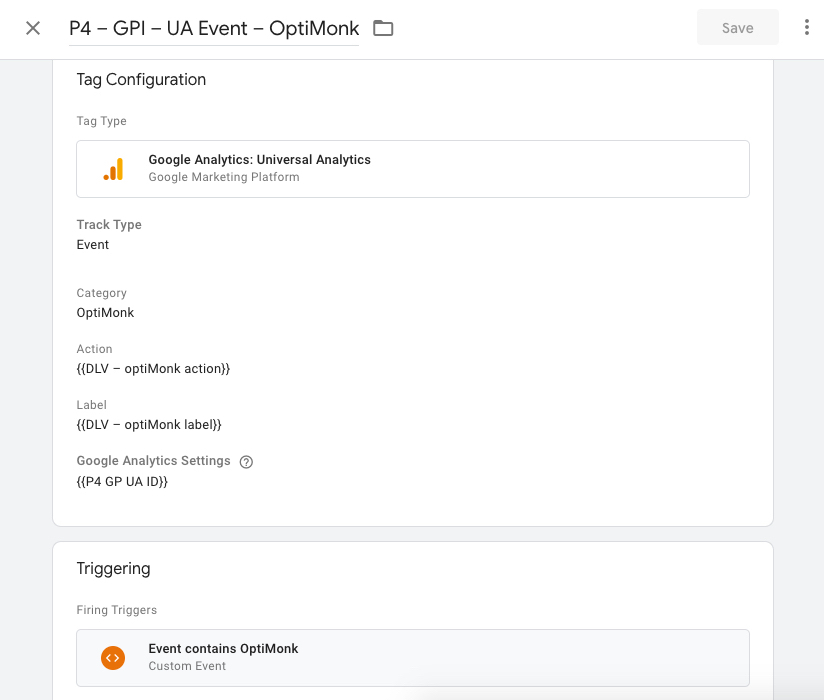
- In Google Tag Manager go to Tags > New > Create a new Universal Analytics tag and select the Event track type:
- Name the event tag as “P4 – GPI – UA Event – OptiMonk”
- Define the event structure as the following. Link the variables created in the action and label fields.
- Category = OptiMonk
- Action = {{DLV – optiMonk action}}
- Label = {{DLV – optiMonk label}}
- Connect the event tag with the Google Analytics Settings variable linked to the Global Property (it’s usually named as {{P4 GP UA ID}}
- Add the trigger you created in the previous step.
- In Google Tag Manager go to Tags > New > Create a new Universal Analytics tag and select the Event track type:


- Check the preview below:
- You can also duplicate the tag above and link it to your local analytics settings variable. This will help you to fire events to both the Global Property and your local account.
- Use the preview mode to debug your setup. The event tag you have just created should be firing on OptiMonks interactions. Check the examples below.
- Event fired when a pop-up is shown:
- Event fired when user closes the popup:
- Event fired when a pop-up is shown:
- You can also use Google Analytics Realtime > Events report to debug your setup:
- Resume of the setup in Google Tag Manager:


If you have any doubts or need any assistance with the setup above, please contact us 🙂
Set up a goal in Google Analytics
We also recommend setting up Goals in your Google Analytics view for monitoring the performance of popup campaigns. Creating a goal for popups goals will help you to measure the conversion rates of your templates and also to run A/B tests.
- Go to Google Analytics > Admin > View > Goals > New Goal
- Select Goal Setup as Custom
- Edit your Goal Description. Give a name and select the goal type as Event
- Input the event structure you want to match for your Goal. The example below can be used for goals that capture the conversions on the popup campaigns:
Obs: Make sure you are leaving the Label field as blank. This will enable you to capture events from all your pop-up campaigns. - Save your goal and use Google Analytics > Realtime > Conversions report to debug your setup:


This will help you to you will be able to monitor the performance of your campaigns within a special OptiMonk Dashboard for Google Analytics.