
Read more about Hotjar’s feedback features: Incoming, Polls & Surveys
Feedback Incoming
Also referred to as passive feedback, a feedback button is a sticky (or floating) button on the screen. Using this tool, visitors can either point out specific areas in a page to give feedback to by highlighting and screen-shooting it (specific feedback) or give generic feedback to the entire page.
What can I get out of it?
- Key actionable Insights
- Emotional Rating: Understand the overall emotional mood of your users in your website
- Deep-dive into sudden spikes in analytics
- URL performance: Low mood rating can indicate problems with a particular page or section on a page
Set up a Hotjar incoming feedback widget in a couple of minutes
To set up an incoming feedback widget on your site, you need A) a Hotjar account (sign up for a free one) and B) to install the Hotjar script on your site.
Start here: create a new feedback widget
In the Hotjar dashboard, under ‘Feedback’ section, click on ‘Incoming’ and then on the big green button – ‘ New Feedback Widget’

Step 1: name your Incoming Feedback
Choose a descriptive name to help you identify your Feedback easily. In the tests we run, we added in the title on which type of pages the feedback is set to be displayed.

Step 2: set the Appearance of the feedback button
Pick your Feedback button language, its position on your page (left or right, bottom or middle ), the reactions style (stars, or emoticons – several types), its color (so you can match it to your own brand), the alternate color (whether you want it light or dark) and whether you want to use the Hotjar branding or not. Removing the Hotjar branding is only available for the Business plan.
On the right side, next to the options, there is a preview where you can see all the changes while setting up the button. You can also switch the preview mode between Desktop and Mobile, to have a better overview on how the button will appear.
Important: When choosing a different language than English, be aware that the content of the button is not immediately changed. This can only be done manually.
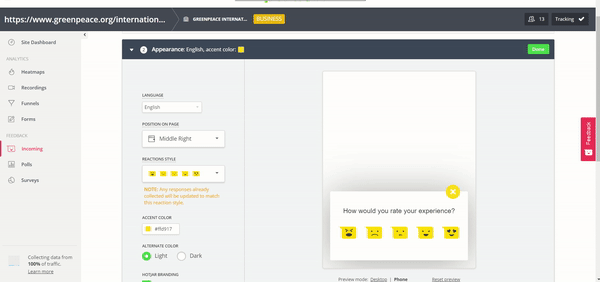
After you finished editing the appearance of the feedback button, click on the ‘Done’ button on top right and move to the next step.
Step 3: Encourage feedback by customizing messaging for your site
Here you have the option to either translate the text of the feedback button or to simply edit in.
At this step, there are 3 questions that you can edit or translate.
First one is related to the emotion the user chooses. The default question is ‘How would you rate your experience?’ and you have the option to ‘Automatically include a screenshot with the user’s feedback’. Otherwise, this option remains with the user, which can choose whether to also submit a screenshot or not.
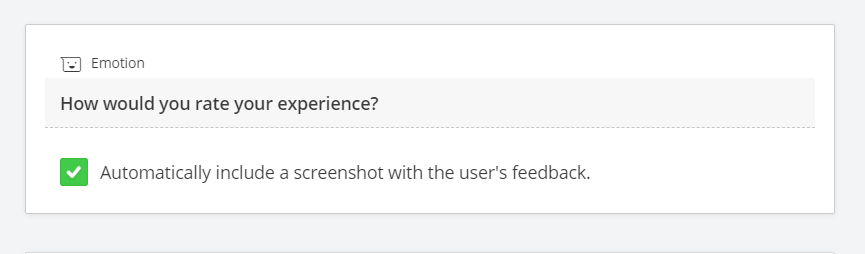
Whenever you modify a question, you can see it on the right side of the screen in real time.
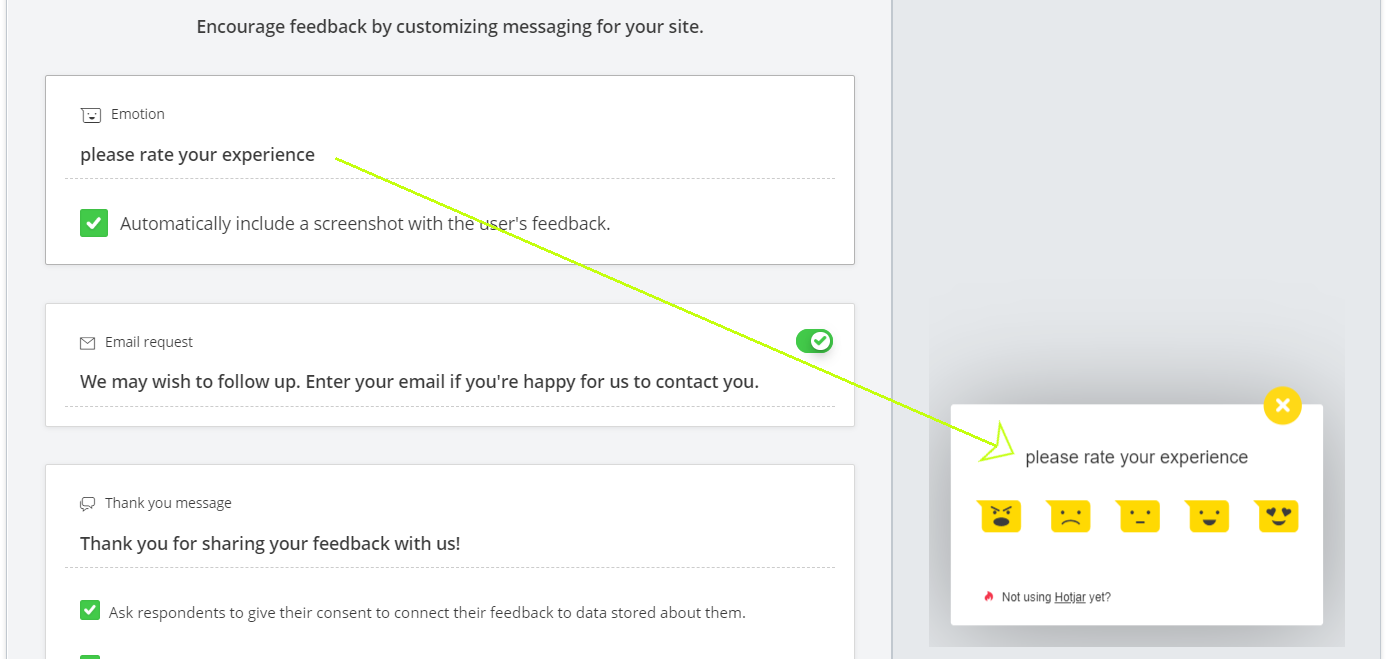
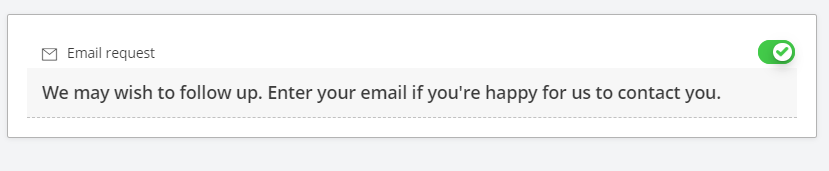
At the second question, you can set up to request the email from the visitors, in case you might want to follow up with them regarding the feedback they submitted.
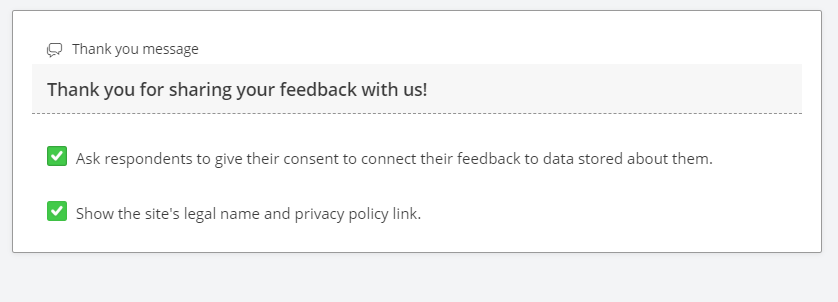
The third question is about the thank you message. Not only you can edit the thank you message that will be displayed, but you can also set up some other options:
- To Ask respondents to give their consent to connect their feedback to data stored about them.
- Without the respondent’s consent, Hotjar cannot connect their feedback to other data stored about their visit such as recordings.
- And to show the site’s legal name and privacy policy link.
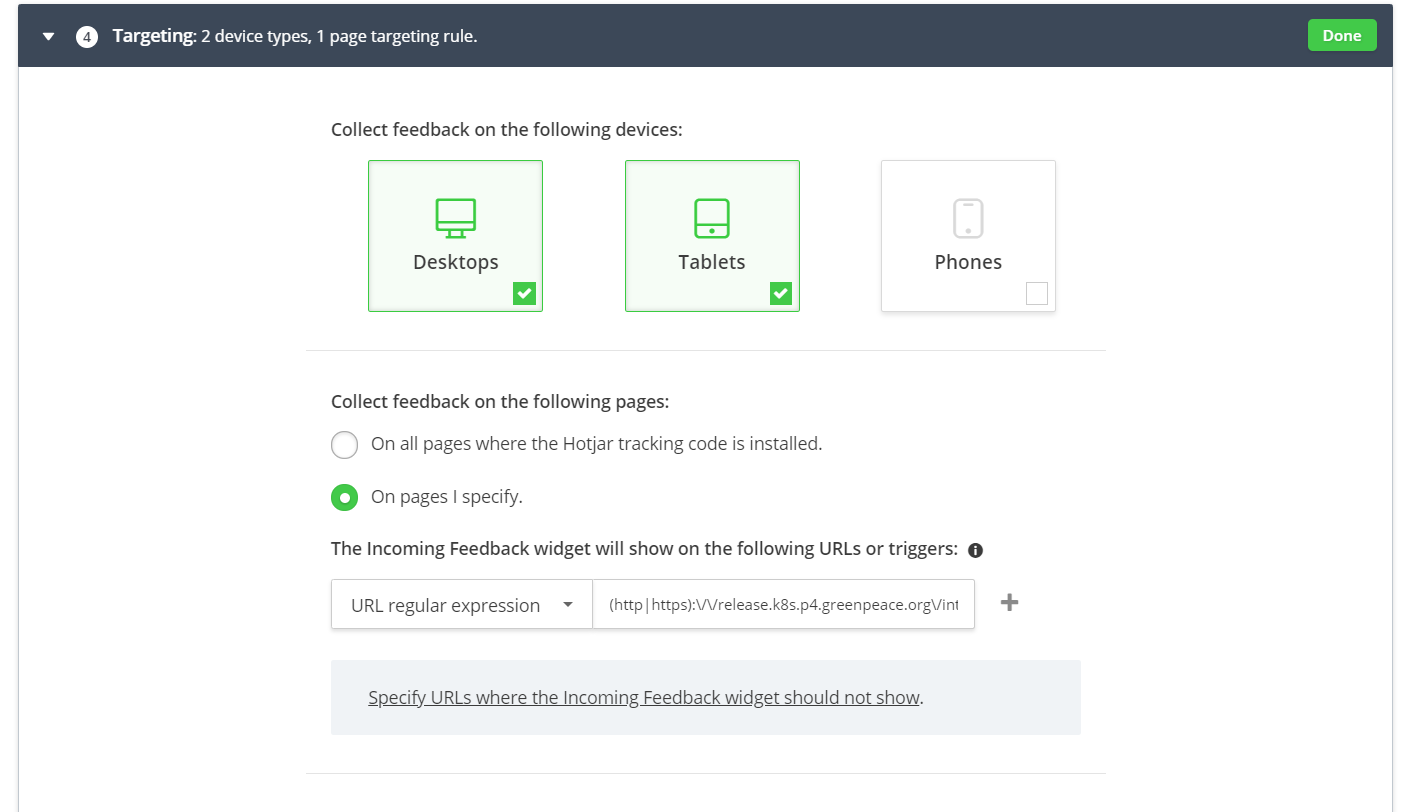
Step 4: Targeting
This section is dedicated to setting up where the feedback button to appear: which devices, which pages and to whom to be shown.
The widget can be shown to all users OR users with specific attributes. For eg, you can set up to show the feedback button to users with specific attributes – however, these attributes need to be set up.
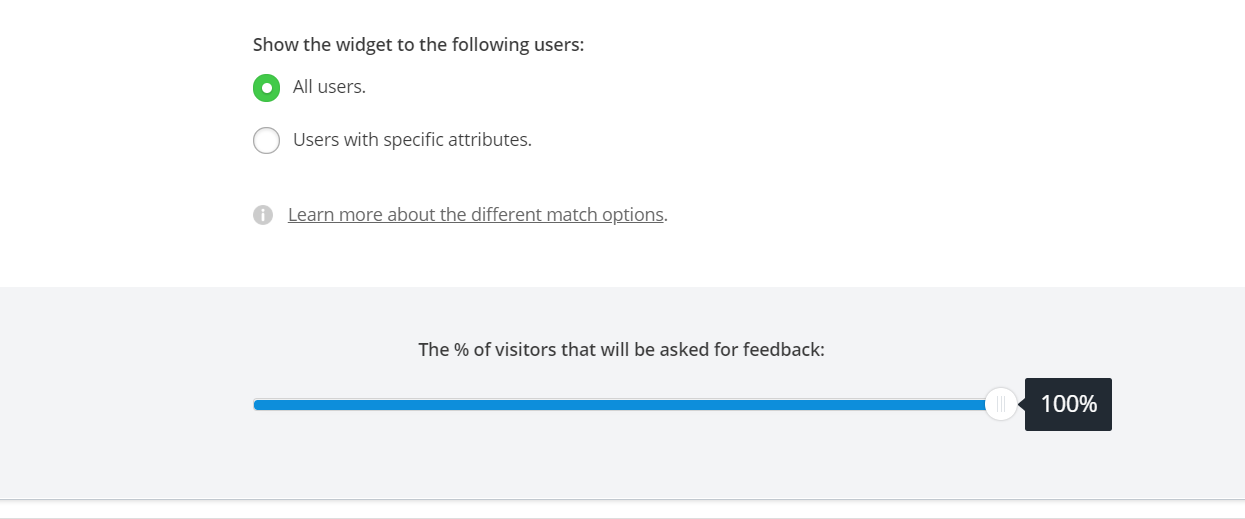
You can also set up the percentage of visitors that will be asked for feedback. It is just a simple bar and you can set up the percentage of visitors by simply moving the round button across the line.
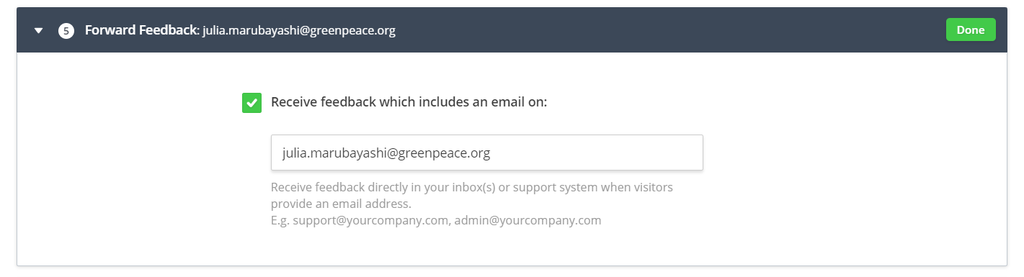
Step 5: Forward feedback
You can also set the feedback which includes the email address of the respondents to be forwarded to someone else from the team.
People who leave their emails are normally people who want to be contacted to follow up with them on the topic they wrote (for eg, maybe they don’t want to donate or receive communication from the organization anymore), so here is where you can setup the feedback with email to be forwarded to someone else in the organization – supporter department for eg.
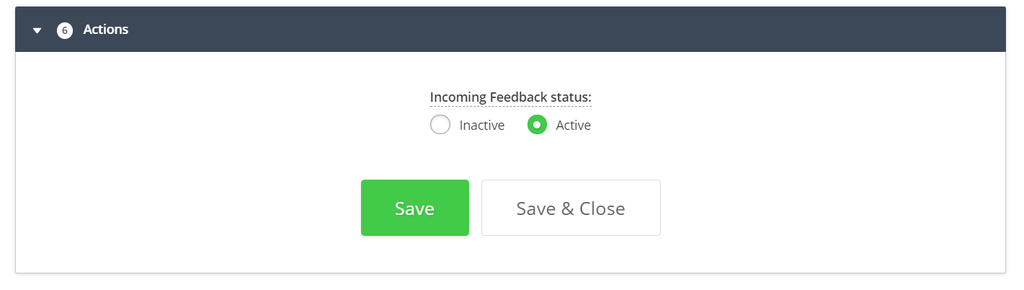
Step 6: Actions
Here is where you can set up the status of the incoming feedback status, whether Active or Inactive and where you also Save the changes to the feedback.
Polls
A Hotjar Poll is a small, slide-in survey that allows website owners or managers to ask questions and collect feedback from people who are visiting specific pages.
What can I get out of it?
Improving the performance and experience of our websites starts with understanding what your visitors want and what’s preventing them from achieving it. You can use polls to target questions to specific visitors anywhere on your website!
Create a Hotjar Poll in 6 easy steps
To create and add a Poll to your website, you need A) a Hotjar account (sign up for a free one) and B) to install the Hotjar script on your site.
Once you’re done, only 6 steps separate you from the websites you’ve seen in this article:
Start here: create a new Poll
Click on “Polls” in the Hotjar dashboard, then “New Poll.”

Step 1: name your Poll
Choose a descriptive name to help you identify your Poll easily.

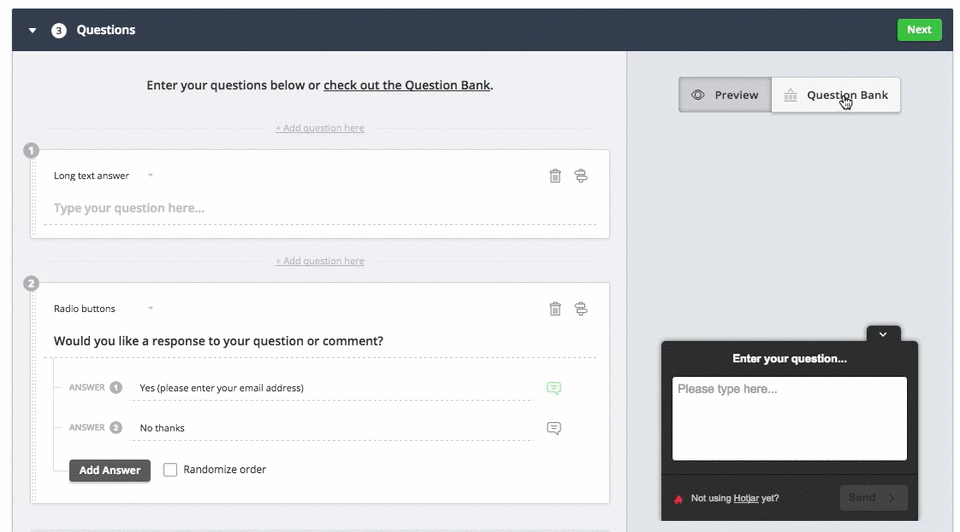
Step 2: pick your question(s)
Pick the question(s) you want to ask your website visitors; you can copy some of the examples you’ve seen in this article, use the pre-written questions available in our question bank, get inspired by this list of 28 customer feedback questions, or come up with something entirely of your own.
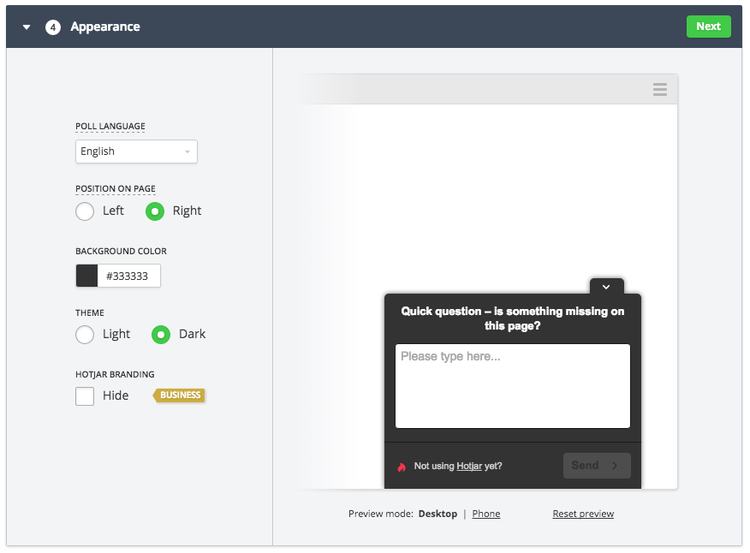
Step 3: customize your Poll’s appearance
Pick your Poll’s language, its position on your page (left or right), and its background color (so you can match it to your own brand). When you are on a Business plan, you can remove the Hotjar branding as well like you may have seen in a few of the examples we used.
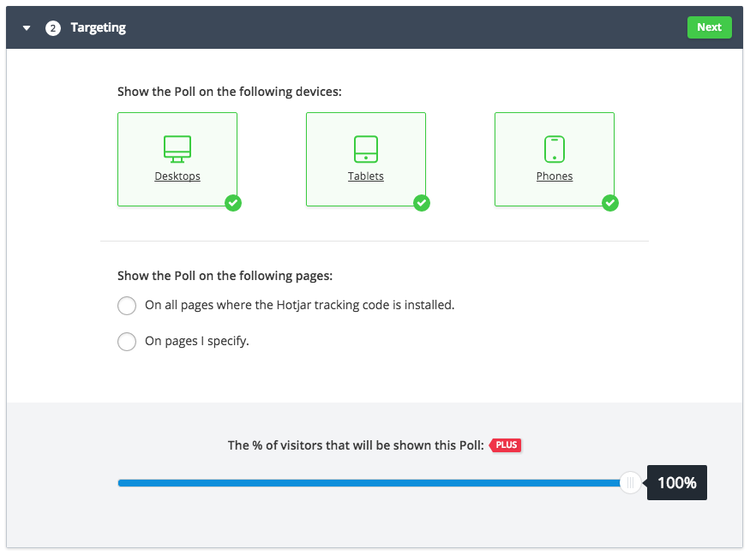
Step 4: select page targeting
Choose on which device(s) to show your Poll, on which pages it will show up, based on which specific JavaScript triggers (go back and review example 16 for an example) and how many of your visitors will be exposed to it.
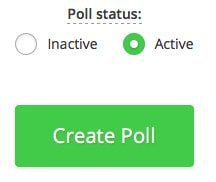
Step 6: send live!
Set the poll status to ‘Active’ and you’re all set.
Final thoughts
If you don’t already have a Poll on your site, I highly recommend you set up one asap. After collecting some feedback, you’ll be able to:
- Understand your visitors and what drives them to your website
- Understand what they like and don’t like (and, most importantly why)
- Find troublesome pages that need fixing
- Create better-converting pages
- Change, update, or revise your content strategy
- Measure the customer experience (for example, through an NPS survey)
Source: Hotjar Blog
Surveys
Hotjar’s Surveys allow you to ask your site visitors or customers an unlimited number of questions. Additionally, you can invite people to fill in your survey directly from any page of your site and based on user behavior.
How to Create Your First Survey
1) Click on New Survey from the Surveys page.
2) Enter the Survey details in the Details panel.
In this panel, you will be able to select the Survey language, give the Survey a name, a description, and a Thank You message. You will also have the option to upload a logo and choose to hide the Hotjar branding.
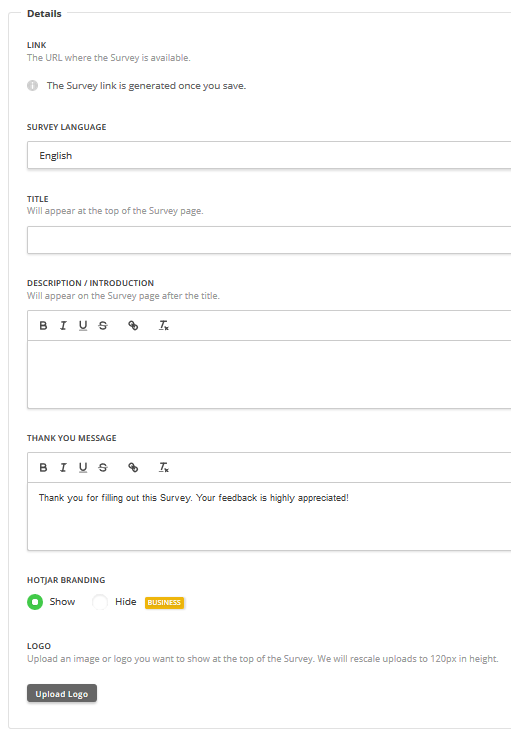
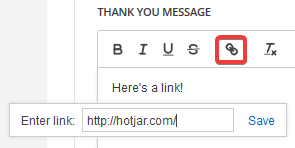
The Description/Introduction and Thank You Message fields allow you to apply bold, italics, underlining or strikethrough styles, as well as add links to any text in these fields. Select any text you wish to apply styles and click on the symbols for the corresponding style.
3) Choose how to invite the user to fill out the Survey.
In the Survey invite panel, you can:
- Customize the invite text.
- Choose the page targeting. Check out the Page Targeting for Feedback Tools Explained and Exclude Pages articles for more information on-page targeting.
- Select the device types on which you wish to trigger the Survey. Whether it is all, mobile-only, tablets only, etc.
- Decide when you want the popup to appear.

Hotjar allows you to choose exactly how users arrive at your Survey. You could trigger the Survey on your site or send the Survey URL directly through email.
4) Start adding questions to your Survey.

In this step, you set up the questions you want to ask your website visitors. Survey layout will differ depending on the type of question you want to ask (including Net Promoter Score® (NPS).
Obs: For each question, you can decide whether the answer is required or not by toggling the REQUIRED switch.
5) Save and activate Survey.

Make sure to check the invite box if you want the Survey to trigger on your site
The Survey Page
Surveys are hosted on Hotjar’s website. When creating a new Survey, you will be provided with a URL which you can give to users directly, such as including it in a newsletter email send out. You also have the option to invite users from your site, which appears as a modal popup.

The Thank You page
When someone completes your survey, they are taken to a Thank You page. You can customize this message, including adding links to pages you would like to encourage users to go to next.

Inviting Users to Answer Surveys

When inviting visitors to a Survey from within your site, visitors are shown a central pop-up asking them to participate. All the text within the popup is fully customizable, including the buttons.
Each user has the option to:
- Take part in the Survey by clicking(1), opening a new tab to the survey page.
- Dismiss the modal and do not participate by clicking on (2) or (3) to close the popup.
Types of questions you can ask participants
Hotjar Surveys support a range of question types that can be grouped as follows:
- Text answer questions
- Radio button questions
- Checkbox questions
- Rating questions
- Net Promoter Score® (NPS) questions
A cookie remembers which Survey Popups have been closed.
When a visitor agrees to participate or not, Hotjar stores a cookie on their browser to remember this. This is done so that the same Survey does not show twice to the same visitor, even if they navigate to a different page where the same Survey is set to show. Learn more about the cookies we store.
Supported Languages
Most of the text in the survey and its questions are written by you, but we allow you to customize the Survey user interface to use over 35 different languages. You can read more here about the languages Hotjar supports.
Connecting Feedback Responses to Recordings
In order for Hotjar to connect Feedback responses submitted through Polls, and/or Incoming Feedback to Recordings, consent will need to be granted.
Connecting the two tools gives you a better understanding of the visitor’s overall experience.
- What does this mean to the user?
- How to turn on the ability to grant/withdraw consent
- What does granting consent allow?
What does this mean to the user?
When you are about to submit your response through a Feedback tool, such as Polls, or Incoming Feedback, you will see the following message:

If you have not granted consent by selecting the “X”, your feedback will still be submitted, but there will be no User ID or searchable Recording associated with the visit.
If you have granted consent by selecting the checkmark, the same Hotjar User ID that is assigned to the Feedback response can now be assigned to a Recording that can display your behaviors and interactions on the site.

Surveys don’t have a consent option
The only feedback tool that doesn’t offer this connection is Surveys which is due to the lack of User ID assignment.
What does granting consent allow?
Granting consent allows the owner/manager of the site to collect and combine the Feedback responses with:
- Any other feedback previously submitted from the same device
- Location (limited to the country)
- Language used
- Device and Browser used
- Custom Attributes (e.g. products or services being using)
- Behavior and Interactions on the page(s) visited
All Behavior and Interaction data collected will be retained for no longer than one year. It will then be automatically deleted. All Feedback responses data submitted is stored in accordance with our Data Retention Policy.
The right to withdraw this consent is present at any time. From the date when the withdraw of consent occurs, we will no longer combine Feedback responses with information about behavior.
Any data collected and combined from the date when consent was granted until the date of withdrawal would have been lawfully processed.
The legal basis for processing this data, which might include personal data, if any provided, is Article 6(1)(a) EU General Data Protection Regulation.¨