The multilingual content migration process is split into 2 steps –
- Migration script related changes
- Important steps in the import process
Migration script related changes
We need to do the separate migration for different languages. for instance, here we have EN and FR language articles.
-
First, pick default language for migration, here EN is default one.
- The migration process is same in general, we just need to take care of few fields(unique_map_id, map_url etc.) in the XML file which maps the post in both languages.
- While migrating EN articles, please check that does this post has FR translation page available. (Example)
- If translation found, then create the unique id name as “unique_map_id“(later on this id is used to import post in `wp-all-import`) and save it in the separate CSV file(connector.csv) along with translation mapping URLs.(Example)
-
FR language POST migration
- While migrating FR articles, again need to check if this post has EN translation page. (Example)
- if translation available, then we need to refer the connector.csv (file generated while EN Post migration) – pick the unique id (unique_map_id) and use it in XML file as unique_map_id for that post.
Important steps in import process(WP-All-Import)
Prerequisite:
To import multilingual content, we need to have the following plugins/addon installed:
- WP All Import plugin
- WPML plugin
- WPML All Import add-on
Important Note: Before start import process, the required taxonomies(Categories, Tags etc.) must be created in all language instances.
The general import process of WP-All-Import is same, only some changes are needed in step 3 and step 4 as follows –
The import process is also split into 2 steps –
- First import default language posts
- Import other language posts
1. First import default language posts
Here, start importing following the usual importing process till Step 3. On step 3 you will see a WPML Add-On metabox. Make sure that the correct language is set.
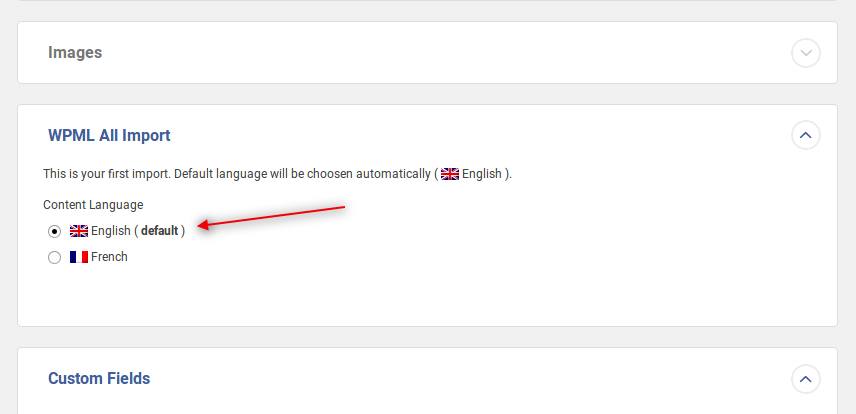
Import EN Posts step3 (WP-All-Import)
On step 4, make sure that the “Unique Identifier” value will map “unique_map_id” from XML file.
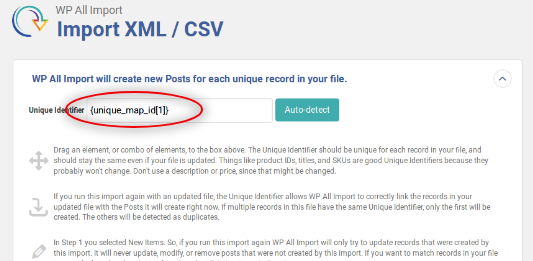
WP-All-Import multilingual Posts Import step4
We are done with EN post-import.
2. Import other language posts
The import process is same till step 3. On step 3, in the WPML Add-On metabox, We will have to set the correct language again. In addition, expand the section “Automatic Record Matching to Translate” and perform the following steps:
- Select the file that we used to import the original posts. (When we perform multiple imports, the list of files to select will, of course be longer.)
- Drag the field that we are using as the “connector” (unique_map_id) to the “Unique Identifier” field. This field “Unique Identifier” must be exactly the same to “Unique identifier” of the 1st (default) import.
That is it. Now proceed as usual, and this import will finish with posts in the second language that will be connected to the originals.
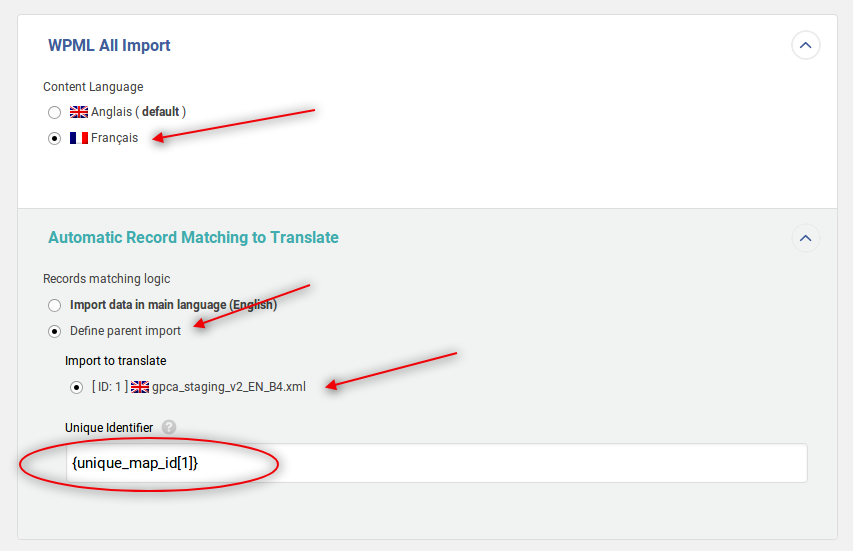
WP-All-Import Step3 mapping fields
And on step 4, make sure that the “Unique Identifier” value will map “unique_map_id” from the XML file.
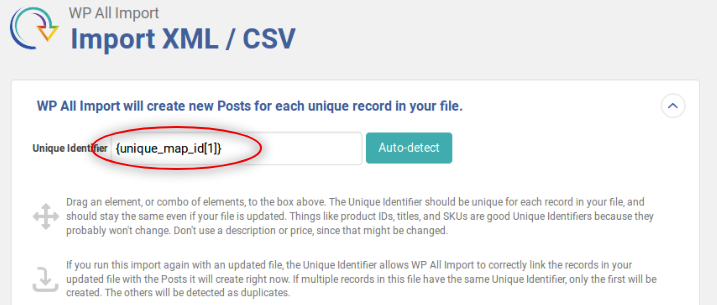
WP-All-Import step 4 mapping of unique identifier
Reference link: https://wpml.org/documentation/related-projects/wpml-all-import-plugin-website-import-with-wpml/


